 I just love making these little square boxes. They are so fun and perfectly hold two decorated peppermint patties. I found these little boxes awhile back on Becky Roberts blog. Her blog is fabulous, she has so many cute things on there. Anyway, if you want to make one of these fun boxes too, HERE is the tutorial from Becky.
Tuesday, September 30, 2008
Square Box Fun...
Monday, September 29, 2008
A Convention Case...Sort of! :)
As one of the prizes I was making I wanted to do three little 3x3 cards and put them in a cello bag and then make a bag topper. Well, I made the cards and then realized I was out of the size of cello bag I needed. Great...there went my plan. :) So as I was working on something else I saw the little box we made at convention and thought 'why not just make a smaller one of these to put my cards in'! So that's what I did. :)

 Stamps: none
Ink: none
Paper: Chocolate Chip, Pink Pirouette, Whisper White , Sweet Always DSP
Accessories: Scallop Edge Punch, Paper Piercer, White 1/4" Grosgrain Ribbon
Oh, and if your wondering...I was feeling like it was time for a new look. I kept looking at my pictures thinking that they always looked washed out, so I think this helps...and if not oh well, because its my blog and I like it! :) We'll see if this look lasts for a bit, I like change though, so it may not. :)
Sunday, September 28, 2008
Altered Notebooks...
 More game prizes and more Bella Rose paper. :) You know when you have scraps on your desk that those are what you tend to use, I haven't cleaned my desk in awhile and still have all sorts of Bella Rose paper sitting there, so that's what I keep using. :) I think its time to clean so I will start using a new fun set of papers. :)
 This notebook is another idea I saw on Chick n Scratch. I liked how she made the cover open up like a book. So fun and a perfect little notebook to keep in your purse. :)
Saturday, September 27, 2008
More Coaster Fun!
After making the post-it holders I thought about making calendars. I printed some calendars and cut them down to 2 3/4" squares and attached all the months to a piece of card stock with a brad, well two. :) Then I got some super strong foam tape and attached that to the decorated coaster. The last thing I did was attached magnet strips to the back so that people could hang them up. So far they have been a big hit. :) The top two are using the Bella Rose Paper and the bottom two are using the fun Washington Apple Paper.
*Don't look to close...I goofed but didn't realize it till after they were all put together. :) I printed 2008 calendars on accident, so I just flipped paper and printed it again with the right year. Well, I didn't think about that people would be able to see the backs of the months when you flip through the calendar. :) Oh well, I will remember for next time. :)
Friday, September 26, 2008
Busy Busy Busy...
I have been busy working on things for this new game I am playing at my workshops. Its kind of like a deal or no deal type of thing. Anyway, I am using 3D items as the prizes for it so I have been busy making up a bunch stuff. :) Over the next few days I will show it all to you. Today's fun goodies are post-it note holders. I saw this idea on Angie Juda's website and have loved them ever since. In fact like in April I ordered a ton of the coasters you use to make them with and then we moved, so they got put in a tote and I forgot all about them until I decided to start making things for this game. :) The first one is using the new Sweet Always DSP...have I mentioned I love this paper. :)
 These next four are with the Bella Rose DSP, I have run out of paper so when my order gets here I have plans for many more of these. :) I love that paper too! :)
Enjoy!
Septembers Workshop Cards...
This month my workshop guests made these two cards. I have decided that I need more time to just stamp because I am having a hard time coming up with things that I think are cute enough for a workshop. :) Both of these cards were cased, the first one I found HERE by Sandi and is almost a total case. Sometimes things are just too cute to change. :) I really liked this card because of it's clean lines and it uses the Eastern Blooms set that is on sale just till the end of the month. :) This card I found HERE on Jill's blog, I used the same layout but changed everything else. I used the new Say it with Scallops set that we received from UPS at convention. I liked the circle shape on the card better though so I just changed the square to a circle. :)
 Card 1:
Stamps: Eastern Blooms, Wow Flowers
Ink: Riding Hood Red, Chocolate Chip
Card stock: Baja Breeze, Chocolate Chip, Riding Hood Red, Whisper White
Accessories: Scallop Edge Punch, Paper Piercer, Riding Hood Red Taffeta Ribbon
Card 2:
Stamps: Say it with Scallops
Ink: Pumpkin Pie
Paper: So Saffron, Riding Hood Red, Whisper White Washington Apple DSP
Accessories: Scallop Edge Punch, Paper Piercer, Scallop Circle Punch, 1 3/8" Circle Punch, 1 1/4" Circle Punch, Bashful Blue 1/4" Grosgrain Ribbon
Monday, September 22, 2008
Quick & Easy Thank You Cards...
I needed some thank you cards really quick and I had been working on my candy holders for club and had the scraps of Sweet Always DSP and Regal Rose sitting on my desk. I love when you get ideas and can make things using scraps. :) The second card is using the new In Color Baja Breeze. I haven't used this color much, but I really like it. I think it looks so good with the saffron paper. That fun paper is from the new Washington Apple DSP. So fun, I love having all these new papers to play with. :) Just so you know...I cut a slit in the card with my hobby blade to run the ribbon through then just covered it up with the thank you. :)
 Stamps: Lovely Labels, Say it with Scallops
Ink: Apricot Appeal, Versamark
Paper: Chocolate Chip CS, Regal Rose CS, Sweet Always DSP, Baja Breeze CS, Basic Black CS, Washington Apple DSP
Accessories: 1/4" White Grosgrain Ribbon, Scallop Edge Punch, Scallop Circle & Scallop Square Punch, Paper Piercer, White Embossing Powder, Hobby Blade, Dimensionals
Friday, September 19, 2008
As Promised...
I said I would post pictures of the Hershey sticks holder after club was over. Sorry, I had to keep something a surprise. :) I love this new Sweet Always DSP, it is so fun, and most importantly it is pink and brown, two of my favorite colors! :)
This second one is one I made during club just to give them another idea of how to decorate them, and how fun would it be to get this for Halloween.
Wednesday, September 17, 2008
Color Challenge #23...
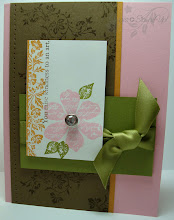
 Look how fun the colors for this weeks color challenge are. Kristina Werner always has such fun color challenges...although, I had a really hard time this week. I guess that's why its a challenge! :) I tried and tried so many things, but it just wasn't coming together how I had planned. I guess I finally found something that would work...that or I was just sick of trying :)...but here it is.
  Now that I look at the picture I am thinking I would have rather done the main card in chocolate chip instead of the olive, maybe I will make another one and see what happens. :)
Stamps: Baroque Motifs, Eastern Blooms
Ink: Bravo Burgundy, Old Olive, So Saffron, Versamark
Card stock: Old Olive, So Saffron, Pumpkin Pie, Whisper White
Accessories: 5/8" Chocolate Chip Grosgrain Ribbon, Distressing Tool, 1/2" Circle Punch, White Embossing Powder, Heat Gun, Dimensionals
Super Simple Birthday Card...
Holy Cow! I can't believe what a terrible blogger I have been...I would like to say its because I have been super busy, but I haven't. So, I promise to try and post a little more often. :)
I worked at the Ogden Rodeo during July selling tickets and one night this guy walked up wearing a shirt that I loved...I told my friend Erin right then that I thought it would make a cool card. So I sketched it out and then I forgot about it until yesterday as I was cleaning off my desk and found the little piece of paper that I sketched it on. Of course I had to make a couple. :)
Here it is...it is REALLY simple, and there isn't any dimension to it, but I still love it. I am going to give it to Erins hubby for his birthday..JPG) Stamps: Wow Flowers
Stamps: Wow Flowers
Ink: Not Quite Navy
Card stock: Whisper White, Riding Hood Red, Not Quite Navy, Going Grey
Accessories: Basic Black Stampin' Write Marker, Ruler (to draw the lines)
Club Card Spoiler...
This is one of the things my club girls will be making, the other is a Hershey sticks holder with the fun new Sweet Always DSP, I will post a pic when club is over. :) I found this card on Splitcoast made by Gretchen Barron, it is pretty much exactly like hers, the only thing I changed was the stamp...I just loved the card so much as soon as I saw it, and there wasn't anyway to make it better in my opinion, so I made mine just like hers. :) Stamps: Batty for you
Ink: Basic Black
Paper: Basic Black, Pumpkin Pie, Kiwi Kiss, Whisper White, Ghostly Greetings DSP
Accessories: 1/4" Black Grosgrain Ribbon, 1 1/4" Circle Punch, 1 3/8" Circle Punch, Scallop Punch, White Gel Pen, Dimensionals
Wednesday, September 10, 2008
Online Ordering Now Available!!!
 Yes! That's right, online ordering is here!!! I'm SO excited, now you can order from my Stampin Up! Website anytime, day or night! You can easily order all of your favorite Stampin' Up! products from the comfort of your own home! Even in the middle of the night in your pjs!! Isn't that awesome?! Just think, when you sitting there at night making a fabulous project and you realize you are out of something, or there is something you just must have, you can just go online and order it! Need a gift for someone that loves Stampin' Up! supplies...go online and order it for them. Its so easy! Just go to my website http://megandunn.stampinup.net/ and then click on the "Shop Now" button that is in the upper right hand corner to place your order. If you have any questions of course you can always contact me! :)
Saturday, September 6, 2008
Swell News...
Ok...so I just found out that two of my cousins are pregnant, well, I knew about one of them but I just found out what she is having, so I wanted to make them up a card to tell them both congrats! Its hard to tell, but I embossed the polka dots with clear embossing powder, I love embossing, I think it just adds so much more to your project. :)
Also, I can't decide which card I like better, I'm thinking I really like the green, I don't know the pink one just feels like it needs something. Any thoughts?
 Stamps: Polka Dot, Swell News (retired)
Ink: Basic Black; Close to Cocoa Craft Ink; Apricot Appeal, Kiwi Kiss, So Saffron, Creamy Caramel, Close to Cocoa, Chocolate Chip, Pink Pirouette, Going Grey (All for coloring the girls)
Card stock: Close to Cocoa, Whisper White, Chocolate Chip, Pink Pirouette, Kiwi Kiss
Accessories: Bella Rose DSP, Blender Pen, Clear Embossing Powder, Scallop Edge Punch, 5/8" Chocolate Chip Grosgrain Ribbon, Pewter Hodgepodge Hardware (retired), Dimensionals
Friday, September 5, 2008
A New Little Trick...
I did this card as one of my workshop cards during August, and long story short, I had a bunch of stuff leftover so I decided to just make them up to have ready when I needed one. :) Well, as I was putting all these cards together I got sick of using a bunch of glue dots and thought the circle would stay on better if it was stapled, but then I was still having to glue the bow on, so *click...on went the light bulb, 'why not staple it all on!' :) I'm sure that lots have you already do this, but I had never seen it, so I was so proud of myself that I thought of a shortcut and I wanted to share it with you. :)
First, I stapled the circle and twill tape to the flower piece. Then, I just tied the twill tape around the staple.
 The wide ribbons and twill tape hide the staple really well.
 Here is the finished card...it was cased from Convention.
 Then I wanted to try it with the 1/4" grosgrain, it works with a regular staple, but it slides around and shows the staple, which is fine sometimes, but sometimes you don't want the staple to show...so I was at Walmart and found a teeny tiny stapler and it works perfect for the 1/4" grosgrain! You can see the difference in sizes...
 and how well the little staple is hidden.
 Anyway, If you read all this, congrats, and like I said, its not a new thing, just new to me! :)
Thursday, September 4, 2008
Color Inspiration Challenge #21...
 Yeah!!! Another color challenge. I really like that Kristina does these fun color challenges, because there have been so many color combos I would have never thought of putting together. Anyway, here is my card for this challenge...I have seen the idea of cutting the scallops to look like a flower and finally did it. It is so easy and it gives a whole other use for the scallop punch! :)
 Stamps: Wow Flowers, Short and Sweet, Polka Dot
Ink: Pacific Point, Rose Red, Regal Rose
Card stock: Pacific Point, Kiwi Kiss, Rose Red, Regal Rose, Whisper White
Accessories: Silver Brads, Scallop Punch, Corner Rounder, 1" Circle Punch, Dimensionals
Monday, September 1, 2008
September Card Kit...

 Yes...I know I have only been offering these one month, but these Card Kits are ALREADY NEW and IMPROVED!!!! We will now be featuring both a Stamp Set of the Month in addition to an Accessory of the Month. This will allow us more flexibility in card kit designs since the amount of product that comes in "bulk" is limited. In addition, there will now be TWO featured Card Designs and you'll receive the supplies to create SIX of EACH design - so you will receive all of the consumable supplies that you need to create 12 cards total. You will also receive 2 additional full color samples of "alternative" cards that you can make with the combined contents of the kit! In addition, you'll receive detailed, step by step instructions on how to complete each of the 4 designs. This month's card kit items are listed below, and the price of the Card Kit is $15. Orders for the Card Kits must be received by September 15th. Kits will ship by the end of the month. Special Offer for September! Purchase the Card Kit and receive the Coordinating Set, "Eastern Blooms" and the Coordinating Accessory, "Clear Buttons" at 20% off! I would be happy to ship these card kits as well, please just add $4.00 if you would like them shipped to you.
The Card Kit ($15) Includes:
· 6 Pieces of 5 ½ x 8 ½" Pacific Point Cardstock
· 6 Pieces of 5 ½" x 8 ½" Kiwi Kiss Cardstock
· 6 Pieces of 4" x 2" Kiwi Kiss Cardstock
· 6 Pieces of 3 ¾" x 2" Pumpkin Pie Cardstock
· 6 Pieces of 3 ½" x 1 ¾" Whisper White Cardstock
· 6 Pieces of 5 ½" x 2" Baja Breeze Cardstock
· 6 Pieces of 5 ½" x ¼" Pumpkin Pie Cardstock
· 6 Pieces of 3" x 2" Pacific Point Cardstock
· 6 Pieces of 1 ¾" x 1 ¾" Whisper White Cardstock
· 6 Pieces of 1" x 1" Pumpkin Pie Cardstock
· 6 Pieces of 1" x 1" Pacific Point Cardstock
· 6 - 3 ½ pieces of Kiwi Kiss Striped Grosgrain Ribbon
· 6 - 3 ½ pieces of Baja Breeze Striped Grosgrain Ribbon
· 12 - 2" pieces of Linen Thread
· 12 - Whisper White Envelopes
· Step by Step Instructions to complete 4 different card designs using the kit pieces
Add-on Products:
· Pacific Point Classic Inkpad ($5.25)
· Kiwi Kiss Classic Inkpad ($5.25)
· Baja Breeze Classic Inkpad ($5.25)
· Pumpkin Pie Classic Inkpad ($5.25)
· Close to Cocoa Stampin' Write Marker ($3.25)
· Pumpkin Pie Stampin' Write Marker ($3.25)
· Eastern Blooms Stamp Set ($21.95) $17.56 with the purchase of the Card Kit
· Clear Buttons ($4.95) $3.96 with the purchase of the Card Kit
Other Optional Purchases:
· 1" Circle Punch ($10.95)
· ¾" Circle Punch ($10.95)
· Stampin' Dimensionals ($3.95)
· 2-Way Glue Pen ($3.50)
Again: orders for these card kits must be placed by September 15th.
Another Card Box...
Here is the other card box that I mentioned I was making with the Bella Rose paper. See THIS post to see the first one I made. :) I love it...I think it looks so much cuter in person. There is a scallop edge on the front of the box that is hard to see in the picture. The four cards inside. They are really simple, but I think that way they could be used for anything. :)
Subscribe to:
Posts (Atom)